Forgotten Weapons
Published 26 Sept 2025Small fast boats with torpedos (or other explosives) have always been a threat to large warships. One of the weapons the British Royal Navy adopted to counter that threat was the Hotchkiss Model 1886 “Quick Fire” gun. This meant that it was a breech-loaded gun that used self-contained cartridge ammunition, instead of separate powder bags and projectiles. Mounted on a recoil-adsorbing soft mount with a wide range of movement and steep depression angle, guns like this could fire at small mobile torpedo boats that a capital ship’s main armament couldn’t handle.
This particular model is a 47mm bore, or 3-pounder as described in British service. It uses a vertically-traveling breech block, and more than 3,000 or them were acquired by the British. Two of them were employed as part of the Falkland Islands coastal defenses at one time. This example is one of two brought down from Gibraltar fairly recently and refurbished for ceremonial use on the Islands. Thanks to the FIDF for setting it up on its mount so I could film it for you!
(more…)
February 19, 2026
Hotchkiss Model 1886 3-pounder Quick Firing Gun
November 15, 2025
QotD: The innovation of infiltration tactics in trench warfare
One way to respond to a novel tactical problem is with novel tactics. And the impetus for this kind of thinking is fairly clear: if your own artillery is the problem digging you into a hole, then find a way to use less of it.
The mature form of this tactical framework is often called “Hutier” tactics, after German general Oskar Emil von Hutier, though he was hardly the sole or even chief inventor of the method. In its mature form, the technique went thusly: instead of attacking with large waves of infantry which cleared each objective in sequential order, attacks ought to be proceeded by smaller units, carefully trained with the layout of the enemy positions. Those units, rather than having a very rigid plan of attack, would be given those general objectives and left to figure for themselves how to accomplish them (“mission tactics” or Auftragstaktik)1, giving them more freedom to make decisions based on local conditions and the ground.
These elite spearhead units, called Stoßtruppen or “Stormtroopers” were well equipped (in particular with a higher amount of automatic firearms and hand grenades, along with flamethrowers). Importantly, they were directed to bypass enemy strong-points and keep moving forward to meet their objectives. The idea here was that the follow-up waves of normal infantry could do the slow work of clearing out points where enemy resistance was strong, but the stormtroopers should aim to push as deeply as possible as rapidly as possible to disorient the defenders and rapidly envelop what defenses remained.2
These sets of infantry tactics were in turn combined with the hurricane barrage, a style of artillery use which focused on much shorter but more intense artillery barrages, particularly associated with Colonel Georg “Breakthrough” Bruchmüller. Rather than attempting to pulverize defenses out of existence, the hurricane barrage was designed merely to force enemies into their dugouts and disorient the defenders; much of the fire was directed at longer ranges to disrupt roads and artillery in the enemy rear. The short barrage left the ground relatively more intact. Meanwhile, those elite infiltration units could be trained to follow the creeping barrage very closely (being instructed, for instance, to run into the shell explosions, since as the barrage advantages, no gun should ever strike the same spot twice; a fresh shell-hole was, in theory, safe). Attentive readers will recognize the basic foundations of the “move fast, disorient the enemy” methods of the “modern system” here.
So did infiltration tactics break the trench stalemate? No.
First, it is necessary to note that while infiltration tactics were perhaps most fully developed by the Germans, they were not unique to them. The French were experimenting with many of the same ideas at the same time. For instance, basic principles of infiltration were being published by the French General Headquarters as early as April, 1915. André Laffargue, a French infantry captain, actually published a pamphlet, which was fairly widely distributed in both the French and British armies by the end of 1915 and in the American army in 1916, on exactly this sort of method. In many cases, like at the Second Battle of Artois, these French tactics bore significant fruit with big advances, but ran into the problem that the gains were almost invariably lost in the face of German counter-attacks. The Russians, particularly under Aleksei Brusilov, also started using some of these techniques, although Brusilov was as much making a virtue of necessity as the Russians just didn’t have that much artillery or shells and had to make do with less and Russian commanders (including Brusilov!) seem to have only unevenly taken the lessons of his successes.
The problem here is speed: infiltration tactics could absolutely more efficiently overrun the front enemy lines and even potentially defeat multiple layers of a defense-in-depth. But after that was done and the shock of the initial push wore off, you were still facing the same calculus: the attacker’s reinforcements, shells, artillery and supplies had to cross broken ground to reach the new front lines, while the defender’s counter-attack could ride railways, move over undamaged roads and then through prepared communications trenches. In the race between leg infantry and trains, the trains always won. On the Eastern Front or against the Italians fighting under the Worst General In History at Caporetto (1917), the already badly weakened enemy might simply collapse, producing massive gains (but even at Caporetto, no breakthrough – shoving the enemy is not a breakthrough, to qualify as a breakthrough, you need to get to the “green fields beyond” that is open ground undefended by the enemy), but against a determined foe, as with the 1918 Spring Offensives, these tactics, absent any other factor, simply knocked big salients3 in the line. Salients which were, in the event, harder to defend and brought the Germans no closer to victory. Eventually – often quite rapidly – the front stabilized again and the deadlock reasserted itself. Restoring maneuver, the actual end-goal of these tactics, remained out of reach.
None of this is to say that infiltration tactics were useless. They represented a real improvement on pre-war infantry tactics and continue to serve as the basis for modern infantry tactics. But they could not break the trench stalemate or restore maneuver.
Bret Devereaux, “Collections: No Man’s Land, Part II: Breaking the Stalemate”, A Collection of Unmitigated Pedantry, 2021-09-24.
- Because it doesn’t fit anywhere else, I want to make a rather long note here. There is an odd tendency which I find quite frustrating, in which military concepts, unit designations and terminology from other languages are all translated into English when used, except for German terms. I suspect this has to do with the high reputation German military thinking holds in among the general public and some military practitioners. I do not share this view; both the German Imperial Army and the Nazi Wehrmacht (another term we never translated yet we feel no need to call the French army l’armée de terre) managed to lose the only major wars they were in, leading to the end of the states they served. Both armies were capable at some things and failed at others; their record certainly does not make German some sort of Holy Language of War. Nevertheless, where German technical terms are notable, I will include them so that the reader will know, should they encounter them elsewhere, that this is a term they are already familiar with, albeit in translation.
- It should be noted that the emphasis here remained on envelopment and destruction rather than on disorientation. The latter is a feature of subsequent systems based on German maneuver warfare, but was not a goal of the doctrine itself initially.
- A salient is a bulge in the line such that your position is bordered by the enemy on three sides. Such positions are very vulnerable, since they can be attacked from multiple directions and potentially “pinched off” at the base.
November 11, 2025
Four battles of the Canadian Corps
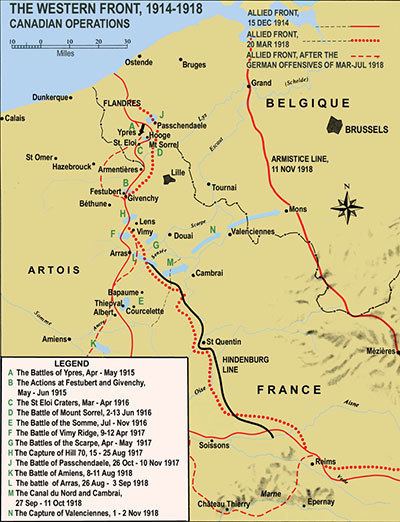
Following on from part one (excerpted here), The Black Horse outlines four major battles that the Canadians fought on the western front during the First World War:

Sir Arthur Currie
Portrait by William Orpen, 1919.
The first part of the series was a political biography of Currie; the second part attempts to tell the story of the Canadian Corps at war through somewhat detailed account of four important battles. The piece is only partly biographical, it partly tells the story of Currie’s war, and partly tells the story the Canadian men who fought for the British Empire in the Great War. It’s a story of incredible martial prowess, but the careful reader will also observe a story of warring duties placed upon the leader of a colonial army; duty to his men, duty to the political leadership of his colonial people and the future of that nation, duty to the objectives of the imperial power on whose behalf he fought, and finally duty to glorious Victory. Currie ended his life understood by those with eyes to see as a great warrior and a military genius; but disliked by his men and hated by the leadership of his people because he prioritized the needs to the Empire and of Victory; but after the war the Empire was of limited service to Currie and to the Canadian people. I leave to the reader, to history, and to God, to decide the value of Victory.
[…]
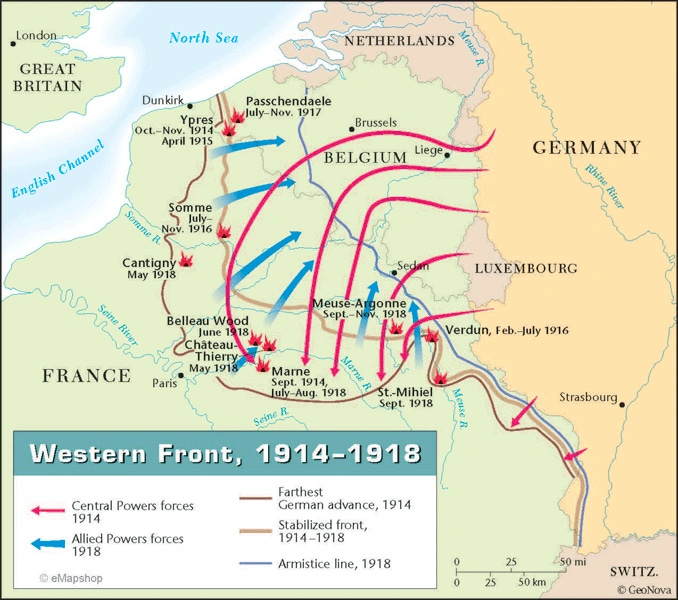
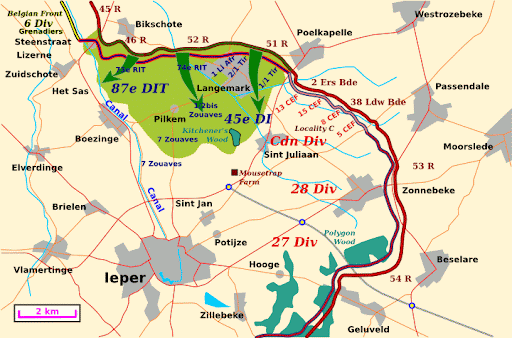
2nd Battle of Ypres
In the spring of 1915 the early dynamic advances of the German army were a distant memory faded behind the great defeat at the First Battle of the Marne. Through the winter both sides had dug in; and many German troops were redeployed to the Russian front. German chemists Walther Nernst and Fritz Haber brought forward the idea of using heavier-than-air Chlorine gas, carried on the wind, to overcome the mathematical impossibility of conventional attack. On April 22, 1915, Albrecht of Württemberg led 7 German divisions to attack 8 Allied divisions, including the 1st Canadian Division under the command of Sir Edwin Alfred Hervey Alderson. The attack began with the release of 168 tons of chlorine gas at about 1700h along a 4 mile stretch of the front around Langemark.
[…]
Vimy Ridge
For a year and a half after Ypres, Currie & the Canadian Corps continued to fight desperate engagements along the Western front with no clear strategic conclusion. After heavy losses and a lot of hard-learned lessons at the Somme from Sept 1915-Sept 1916, the Canadian Corps and Currie with them had become both hardened by bitter experience, and desperate to find better ways to prosecute the war. In September 1915 he was recorded to have said “I did not care what happened to me, but to my men, to their wives, their mothers, their children and to Canada I owed a duty which I wanted to fulfill to the very best of my ability”. Later that year as the division struggled with desertion, he ordered the execution of a deserter despite a three hour plea for clemency by the divisional cleric. The decision restored discipline, but haunted Currie’s dreams long afterwards.
In May 1916 Julian Byng took command of the Canadian Corps, replacing Sir Edwin Alderson. In the fall of that year, after heavy losses in a series of engagements at the Somme, Byng was given the opportunity to reorganize and refit the Canadian Corps; he looked to Currie as a key partner in the effort. They replaced the ineffective Ross Rifle with the Lee Enfield, reorganized the platoon structure to include heavy weapons within each platoon [machine guns, mortars, etc.], and implemented new training and tactics like rehearsals for advances, and the “creeping barrage”, carefully coordinated intended to keep artillery shells landing slightly ahead of advancing men.
[…]
Hill 70
After Vimy, Julian Byng was promoted. Currie was promoted in turn to lead the Canadian Corps. He would lead the Corps that he and Byng had made into one of the most effective fighting forces on any side of the conflict and lead it to bloody victory again and again. There is perhaps no better example of the mastery of the Canadian Corps, from top to bottom, than the battle of Hill 70. “Hill 70 was as close to a perfect battle as was ever fought on the Western Front” wrote historian Tim Cook.
[…]
The Hundred Days Offensive & the Pursuit to Mons
As the winter of 1917-18 passed, a new set of highly political decisions concerning whether and how to reorganize the Canadian Corps for the next round of fighting were taken. As noted in part one, Currie opted to split up the newly formed 5th division to reinforce the four divisions of the Canadian Corps and triple the size of the field engineering element. The decision optimized the Canadian Corps as an attacking force; and when they returned to the front that’s exactly how they would be used. Between August 8th and November 11th, 1918, the Canadian Corps fought nine major battles advancing 86 miles, and suffering 45,835 casualties [The force that began the offensive was ~100,000]. By comparison, the substantially larger American Expeditionary Force, over this same period, advanced only 34 miles while capturing only half the number of prisoners, suffering roughly twice the casualties per German division defeated.
November 9, 2025
Sir Arthur Currie, commander of the famous Canadian Corps in WW1
As a counterpoint to the OTT summary of Sir Arthur posted last week, here’s The Black Horse with part one of a two-part look at the man’s early career before joining the Canadian Expeditionary Force in Europe:
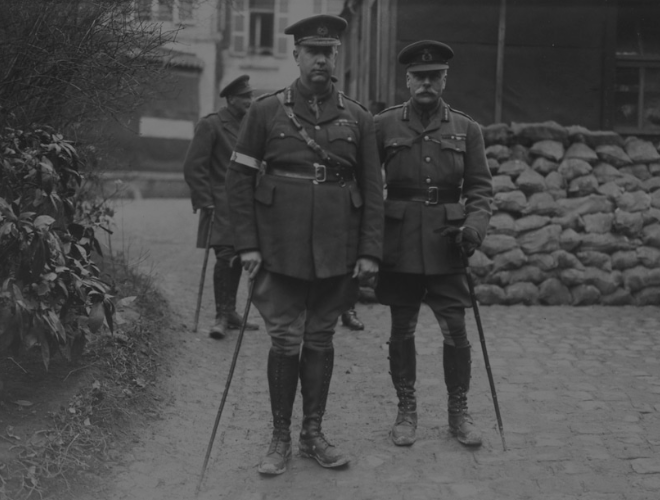
Sir Arthur Currie with Field Marshal Sir Douglas Haig, February 1918.
Libraries and Archives Canada item ID number 3404878.
The Red Ensign is a publication deeply interested in leadership; the good, the bad, and the ugly. For this reason, this Remembrance Day, I have chosen to draw the audience’s attention to the life and times of Sir Arthur Currie, the first Canadian commander of the Canadian Corps during the Great War. This presents an opportunity to both on honour and reflect upon the courage and sacrifice of the men who have fought under the flag of this great nation, but also offers the language to articulate the task facing any who would attempt to lead Canada today. As Currie’s war was defined by the challenge [of] leadership of Canadians in the context of the shifting priorities of the late British Empire, any who would seek to lead Canadians today face will struggle to harmonize efforts on behalf of the Canadian people and the priorities and policies of the American power block which he cannot eschew.
Dulce et decorum est pro patria mori; but when your country is an Imperial Dominion, who and what is “pro patria“, and how can one spend their life for them?
The Man Before the Great Man:
Arthur Currie was born in 1875 in Napperton, Ontario [50 km West of London], the third of eight children living on a homestead belonging to his grandfather. Raised with a the vigorous discipline of a Methodist home, Currie would remain a convicted Christian for his entire life, though he converted to Anglicanism as an adult. Currie was a good student, intending to pursue a career in law or medicine but dropped out of school twice, first temporarily because of the financial constraints brought on by the death of his father, and then for a second time at 19 because of a quarrel with one of his teachers. After leaving school he went West; after a string of failed efforts to establish himself via entrepreneurship and real-estate speculation he joined the Canadian militia as a gunner in 1897 in Victoria B.C. at the age of 23. A giant man (6’3″ at a time when the average Canadian height was 5’7″) with a noted eye for technical detail and, in the words of his son, a “tremendous command of profanity”, he quickly distinguished himself and was promoted to corporal before earning a commission as an officer in 1900. As an officer in peace time Currie was noted for his detailed inspections and his rapid transformation from “one of the boys”, into a rigid disciplinarian. This duality, an officer raised from the ranks, who could both embody the rigid tradition of the British military and who had an intimate familiarity with the life and ways of the enlisted men would become a defining feature of his career.
During Currie’s peace-time career as an officer he maintained a second career as a real-estate [agent]. After becoming head of Matson Insurance Firm 1904, he and the firm invested aggressively in the Victoria real-estate market. In 1913 Currie’s financial situation began to rapidly deteriorate as a consequence of price declines in the real-estate market. Currie’s financial problems nearly led him to refuse to stand up the 50th Regiment Gordon Highlanders of Canada in 1913. In July 1914 Curry used $10,833.34 of regimental funds intended for the purchase of uniforms and kit to pay his personal debts, and found himself facing forcible retirement just as the Canadian Army was being mobilized for war. At the intervention of one of his subordinates, Major Garnet Hughes, he instead accepted promotion as brigadier-general of the 2nd Brigade of the 1st Canadian Division, and ignored correspondence from the new commander of the 50th regiment, Major Cecil Roberts, about the missing funds until he was overseas.
Currie arrived at camp Valcartier on September 1st, 1914 to find himself charged with 10x as many men as he had ever led before, no staff, a shared tent as a command center, and the duty to prepare these men for one of the most difficult theatres of war the world has ever seen. The six months between taking command and the arrival of his brigade in the trenches near Ypres were marked by two mud besotted poorly supplied training camps, shoddy kit, rampant disease, and the company of a certain bear that was to become beloved by children around the world. Through this period Currie was well liked by the men, but known as a disciplinarian with an eye for technical detail. In March 1915 the brigade was deployed to what was expected to be a quiet part of the front with the intent of allowing the men to gain some experience with trench warfare before they were relied upon for action. Nobody anticipated what would happen next.
November 4, 2025
The Bear Who Beat the Nazis | Wojtek
The Rest Is History
Published 29 Jun 2025The story of Wojtek — the bear who took on the Nazis — amidst the death and devastation of the Second World War, and more specifically Poland’s heroic resistance, is a flicker of redemption amidst an otherwise deeply depressing period of history. His is a life that exemplifies not only Poland’s struggle in microcosm, but also the global nature of the war overall. Discovered by a young boy as a tiny cub, his mother dead, he was sold to Polish officers travelling to Palestine in the hills outside Tehran. The soldiers nursed and fed the young bear with milk from a vodka bottle, treating him like one of their own. Later, he was even purported to keep them warm at night, drink beer, delight in wrestling and showers, and both march and salute. When the Polish forces were finally deployed to Europe, “Wojtek” as he had been named, went with them; a mascot and morale booster to the men. There he was given military rank, and actively participated in the Italian campaign, carrying ammunition and artillery crates. But with death and destruction on all sides, what would be his fate?
Join Tom and Dominic as they discuss Wojtek, one of history’s most extraordinary animals, and his life in the army — an emblem of hope and resilience in the face of the horrors of the Second World War.
(more…)
October 9, 2025
Russia’s Great Retreat 1915
The Great War
Published 9 May 2025In May 1915, the Central Powers launched one of the greatest offensive operations of the First World War. The armies of Germany and Austria-Hungary planned to smash their way through Russia lines and tip the strategic balance in their favor. The result was one of the biggest and bloodiest campaigns of the war, known today as the Great Russian Retreat.
(more…)
June 17, 2025
QotD: What is a “tank”?
And we should stop to note that as with any question of definition, this one too is language-sensitive. The exact confines of a term vary from one language to another; kampfpanzer, for instance is not necessarily an exact synonym for “tank”.
In any event, the basic demands of early tanks were dictated by the realities of the Western Front: a tank needed to be able to resist small arms fire (particularly machine guns), deliver direct supporting fire itself, it needed to be able to move on the muddy, artillery-flattened ground and it needed to be able to cross a trench. This last requirement – the need to be able to both climb a parapet (usually c. 4ft) and then cross over an 8ft wide trench – was significant in the design of early tanks.
Those factors in turn dictated a lot of the design of early tanks. The armor demands of resisting small arms fire meant that the vehicle would be heavy (and indeed, as soon as tanks appeared amongst Allied troops, their German opponents began introducing more powerful bullets, like the K bullet and later the 13.2mm anti-tank round fired from the Mauser 1918 T-Gewehr). And here is the first advantage of tracks. The weight of a vehicle is distributed along all of the area of contact it has with the ground; with tires that area is limited to the bottom of the tire so the total area of ground contact is fairly low, which is fine for most vehicles.
But tanks are heavy. Really heavy. Even something like the Renault FT could mass around 7 tons and by later standards that would be classified as a tankette (a “mini-tank” as it were); by WWII, medium tanks often clocked in around 30 tons. If you put a vehicle like that on tires, you are going to create a LOT of pressure on those small points of contact. That might still be OK if you are just going to drive on roads and other firm surfaces which can take the pressure. But remember: tanks were designed for the Western Front, which looks like this.
Fortunately for the landship committee, this wasn’t a new problem: farming tractors were also heavy and also had to operate in churned up (in this case, plowed) soft soil; the heaviest of these vehicles had much the same problem and the solution was continuous tracks or “treads”. When kept properly tensioned – tune in, by the by, to Nicholas “The Chieftain” Moran’s YouTube for more than you ever want to know about track tension – the track distributes the weight of the tank across the entire section of the track touching the ground, which reduces the ground pressure at any given point, allowing a big heavy tank to roll over terrain where even a much lighter wheeled vehicle would get stuck.
This is one of those points where the functionality of a tank (what a tank does) has such a strong influence on design that the design implications of the functionality become part of the definition: a tank has to be heavily armored and has to be able to move off-road and as a result has to be tracked, not wheeled. One might be able to imagine some sort of exotic technology that might make it possible to do all of the things a tank does without tracks, but we don’t have that yet.
The other factor was fire. I’ve mentioned this before, but one of the significant background factors of WWI is that a lot of the belligerents misjudged the kind of artillery they’d need for a general European war. Not to get too deep into the weeds here, but most of the belligerents expected a relatively rapid war of maneuver and so thought that light, direct-fire artillery like the famed French ’75 (the Matériel de 75mm Mle 1897) would be the most useful. Those guns could be moved quickly and could deliver a lot of quick firepower on static or moving formations of enemy infantry in support of friendly infantry.
The problem is that in the conditions of trench warfare, those guns – as they were configured, at least – were far less useful. They were, first off, much shorter in range which meant they had to be brought dangerously far forward to do their direct fire role – often so far forward they could be engaged by enemy rifles and machine guns. This was compounded by the fact that direct fire at range was ineffective against trench works (which are dug down into the earth). But at the same time, the value of rapid firing (because these lighter guns could fire a lot faster than the heavy, indirect fire artillery) direct fire artillery remained high, if only you could get it to the fight.
This was also a problem a tank could solve: as a mobile, armored platform it could move a rapid-firing direct fire gun forward without immediately being knocked out by enemy small arms to support the infantry. There is, I should note, early complexity on this point, with both “male” (heavy direct fire cannon focused) and “female” (machine gun focused) tanks in WWI though in the end “hermaphrodite” designs with both capabilities (but much more focus on the main cannon) triumph, so that’s what we’ll focus on.
And that gets us the fundamental role structure for tanks: enough armor to resist enemy small arms (but with the understanding that some weapons will always be effective against the tank), enough mobility to cross the churned up battlefield and some direct fire capability to support the infantry crossing it at the same time.
Bret Devereaux, “Collections: When is a ‘Tank’ Not a Tank?”, A Collection of Unmitigated Pedantry, 2022-05-06.
May 30, 2025
QotD: “Have fun storming the castle!”
Clifford Rogers has already laid out a pretty lay-person accessible account of the medieval siege playbook (in Soldiers’ Lives Through History: The Middle Ages (2007), 111-143; the book is pricey, so consider your local library), so I won’t re-invent the wheel here but merely note some general features. Rogers distinguishes between hasty assaults using mostly ladders launched as soon as possible as a gamble with a small number of troops to try to avoid a long siege, and deliberate assaults made after considerable preparation, often using towers, sapping, moveable shelters designed to resist arrow fire and possibly even catapults. We’ve already discussed hasty assaults here, so let’s focus on deliberate assaults.
While sapping (tunneling under and collapsing fortifications) remained in use, apart from filling in ditches, the mole-and-ramp style assaults of the ancient world are far less common, precisely because most armies (due to the aforementioned fragmentation combined with the increasing importance in warfare of a fairly small mounted elite) lacked both the organizational capacity and the raw numbers to do them. The nature of these armies as retinues of retinues also made coordination between army elements difficult. The Siege of Antioch (1097-8) [during] the First Crusade is instructive; though the siege lasted nine months, the crusaders struggled to even effectively blockade the city until a shipment of siege materials (lumber, mostly) arrived in March of 1098 (five months after the beginning of the siege). Meanwhile, coordinating so that part of the army guarded the exits of the city (to prevent raids by the garrison) while the other part of the army foraged supplies had proved mostly too difficult, leading to bitter supply shortages among the crusaders. Even with materials delivered to them, the crusaders used them to build a pair of fortified towers blocking exits from the city, rather than the sort of elaborate sapping and ramps; the city was taken not by assault but by treachery – a very common outcome to a siege! – when Bohemond of Taranto bribed a guard within the city to let the crusaders sneak a small force in. All of this despite the fact that the crusader army was uncommonly large by medieval European standards, numbering perhaps 45,000.
Crucially, in both hasty and deliberate assaults, the emphasis for the small army toolkit tends to be on escalade (going over the walls) using ladders or moveable wooden towers, rather than the complex systems of earthworks favored by the “big army” siege system or breaching – a task which medieval (or ancient!) artillery was generally not capable of. The latter, of course, is a much more certain method of assault – give a Roman army a few months and almost any fortress could be taken with near certainty – but it was a much more demanding method in terms of the required labor and coordination. Thwarting escalade is mostly a question of the height of defenses (because a taller wall requires a taller ladder, tower or ramp) and good fields of fire for the defenders (particularly the ability to fire at attackers directly up against the wall, since that’s where the ladders are likely to be).
The other major threat to castle walls (apart from the ever-present threat of sapping) was catapults, but I want to deal with those next time for reasons that I suspect will make sense then. For now it is worth simply noting that catapults, even the mighty trebuchets of the 14th century were generally used to degrade defenses (smashing towers, destroying crenellation, damaging gatehouses) rather than to produce breaches. They could in some cases do that, but only with tremendous effort and a lot of time (and sometimes not even then). Consequently, for most castles the greatest threat remained escalade, followed by treachery or starvation, followed by sapping, followed by artillery.
Bret Devereaux, “Collections: Fortification, Part III: Castling”, A Collection of Unmitigated Pedantry, 2021-12-10.
April 13, 2025
The Most Pointless Battle of WW1? – Passchendaele 1917
The Great War
Published 11 Apr 2025For more than three long months in 1917, Allied and German soldiers fought tooth and nail over a battlefield churned into a sea of sucking mud and shellholes by the guns. Hundreds of thousands were killed and wounded, some of them drowning in the soupy ground — for Allied gains of just a few kilometers. So why did the Battle of Passchendaele happen at all, and was it the most pointless battle of the First World War? (more…)
March 15, 2025
Canada’s Unique WW2 Rocket Artillery: The Land Mattress
OTD Military History
Published 12 Nov 2022The Land Mattress, officially known as Projector, Rocket 3-inch, No 8 Mk 1, was the Canadian rocket launcher used during World War 2. The last surviving example is on display at the @CanWarMus.
(more…)
November 28, 2024
QotD: The trace italienne in fortification design
Since the goal remains preventing an enemy from entering a place, be that a city or a fortress, the first step has to be to develop a wall that can’t simply be demolished by artillery in a good afternoon or two. The solution that is come upon ends up looking a lot like those Chinese rammed earth walls: earthworks are very good at absorbing the impact of cannon balls (which, remember, are at this point just that: stone and metal balls; they do not explode yet): small air pockets absorb some of the energy of impact and dirt doesn’t shatter, it just displaces (and not very far: again, no high explosive shells, so nothing to blow up the earthwork). Facing an earthwork mound with stonework lets the earth absorb the impacts while giving your wall a good, climb-resistant face.
So you have your form: a stonework or brick-faced wall that is backed up by essentially a thick earthen berm like the Roman agger. Now you want to make sure incoming cannon balls aren’t striking it dead on: you want to literally play the angles. Inclining the wall slightly makes its construction easier and the end result more stable (because earthworks tend not to stand straight up) and gives you an non-perpendicular angle of impact from cannon when they’re firing at very short range (and thus at very low trajectory), which is when they are most dangerous since that’s when they’ll have the most energy in impact. Ideally, you’ll want more angles than this, but we’ll get to that in a moment.
Because we now have a problem: escalade. Remember escalade?
Earthworks need to be wide at the base to support a meaningful amount of height, tall-and-thin isn’t an option. Which means that in building these cannon resistant walls, for a given amount of labor and resources and a given wall circuit, we’re going to end up with substantially lower walls. We can enhance their relative height with a ditch several out in front (and we will), but that doesn’t change the fact that our walls are lower and also that they now incline backwards slightly, which makes them easier to scale or get ladders on. But obviously we can’t achieved much if we’ve rendered our walls safe from bombardment only to have them taken by escalade. We need some way to stop people just climbing over the wall.
The solution here is firepower. Whereas a castle was designed under the assumption the enemy would reach the foot of the wall (and then have their escalade defeated), if our defenders can develop enough fire, both against approaching enemies and also against any enemy that reaches the wall, they can prohibit escalade. And good news: gunpowder has, by this point, delivered much more lethal anti-personnel weapons, in the form of lighter cannon but also in the form of muskets and arquebuses. At close range, those weapons were powerful enough to defeat any shield or armor a man could carry, meaning that enemies at close range trying to approach the wall, set up ladders and scale would be extremely vulnerable: in practice, if you could get enough muskets and small cannon firing at them, they wouldn’t even be able to make the attempt.
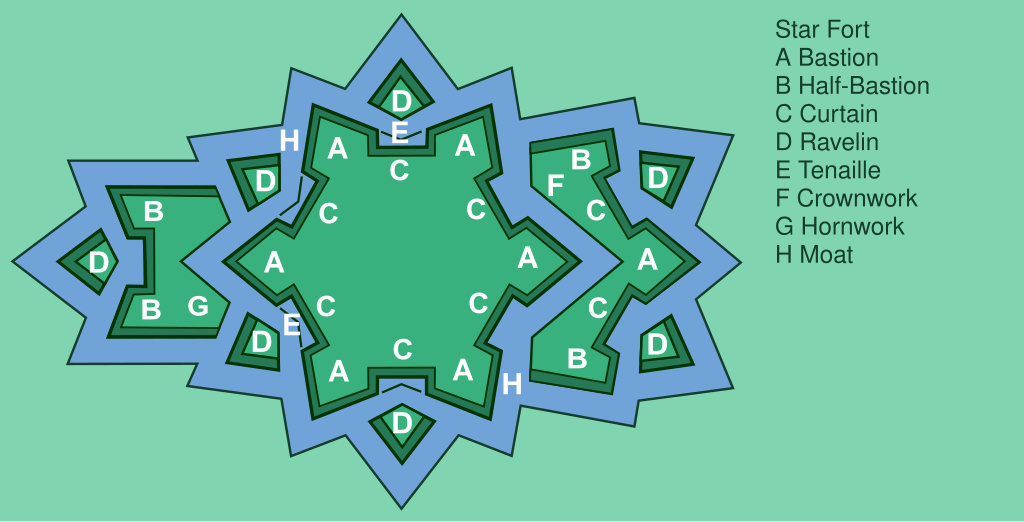
But the old projecting tower of the castle, you will recall, was designed to allow only a handful of defenders fire down any given section of wall; we still want that good enfilade fire effect, but we need a lot more space to get enough muskets up there to develop that fire. The solution: the bastion. A bastion was an often diamond or triangular-shaped projection from the wall of the fort, which provided a longer stretch of protected wall which could fire down the length of the curtain wall. It consists of two “flanks” which meet the curtain wall and are perpendicular to it, allowing fire along the wall; the “faces” (also two) then face outward, away from the fort to direct fire at distant besiegers. When places at the corners of forts, this setup tends to produce outward-spiked diamonds, while a bastion set along a flat face of curtain wall tends to resemble an irregular pentagon (“home plate”) shape [Wiki]. The added benefit for these angles? From the enemy siege lines, they present an oblique profile to enemy artillery, making the bastions quite hard to batter down with cannon, since shots will tend to ricochet off of the slanted line.
In the simplest trace italienne forts [Wiki], this is all you will need: four or five thick-and-low curtain walls to make the shape, plus a bastion at each corner (also thick-and-low, sometimes hollow, sometimes all at the height of the wall-walk), with a dry moat (read: big ditch) running the perimeter to slow down attackers, increase the effective height of the wall and shield the base of the curtain wall from artillery fire.
But why stay simple, there’s so much more we can do! First of all, our enemy, we assume, have cannon. Probably lots of cannon. And while our walls are now cannon resistant, they’re not cannon immune; pound on them long enough and there will be a breach. Of course collapsing a bastion is both hard (because it is angled) and doesn’t produce a breach, but the curtain walls both have to run perpendicular to the enemy’s firing position (because they have to enclose something) and if breached will allow access to the fort. We have to protect them! Of course one option is to protect them with fire, which is why our bastions have faces; note above how while the flanks of the bastions are designed for small arms, the faces are built with cannon in mind: this is for counter-battery fire against a besieger, to silence his cannon and protect the curtain wall. But our besieger wouldn’t be here if they didn’t think they could decisively outshoot our defensive guns.
But we can protect the curtain further, and further complicate the attack with outworks [Wiki], effectively little mini-bastions projecting off of the main wall which both provide advanced firing positions (which do not provide access to the fort and so which can be safely abandoned if necessary) and physically obstruct the curtain wall itself from enemy fire. The most basic of these was a ravelin (also called a “demi-lune”), which was essentially a “flying” bastion – a triangular earthwork set out from the walls. Ravelins are almost always hollow (that is, the walls only face away from the fort), so that if attackers were to seize a ravelin, they’d have no cover from fire coming from the main bastions and the curtain wall.
And now, unlike the Modern Major-General, you know what is meant by a ravelin … but are you still, in matters vegetable, animal and mineral, the very model of a modern Major-General?
But we can take this even further (can you tell I just love these damn forts?). A big part of our defense is developing fire from our bastions with our own cannon to force back enemy artillery. But our bastions are potentially vulnerable themselves; our ravelins cover their flanks, but the bastion faces could be battered down. We need some way to prevent the enemy from aiming effective fire at the base of our bastion. The solution? A crownwork. Essentially a super-ravelin, the crownwork contains a full bastion at its center (but lower than our main bastion, so we can fire over it), along with two half-bastions (called, wait for it, “demi-bastions”) to provide a ton of enfilade fire along the curtain wall, physically shielding our bastion from fire and giving us a forward fighting position we can use to protect our big guns up in the bastion. A smaller version of the crownwork, called a hornwork can also be used: this is just the two half-bastions with the full bastion removed, often used to shield ravelins (so you have a hornwork shielding a ravelin shielding the curtain wall shielding the fort). For good measure, we can connect these outworks to the main fort with removable little wooden bridges so we can easily move from the main fort out to the outworks, but if the enemy takes an outwork, we can quickly cut it off and – because the outworks are all made hollow – shoot down the attackers who cannot take cover within the hollow shape.
An ideal form of a bastion fortress to show each kind of common work and outwork.
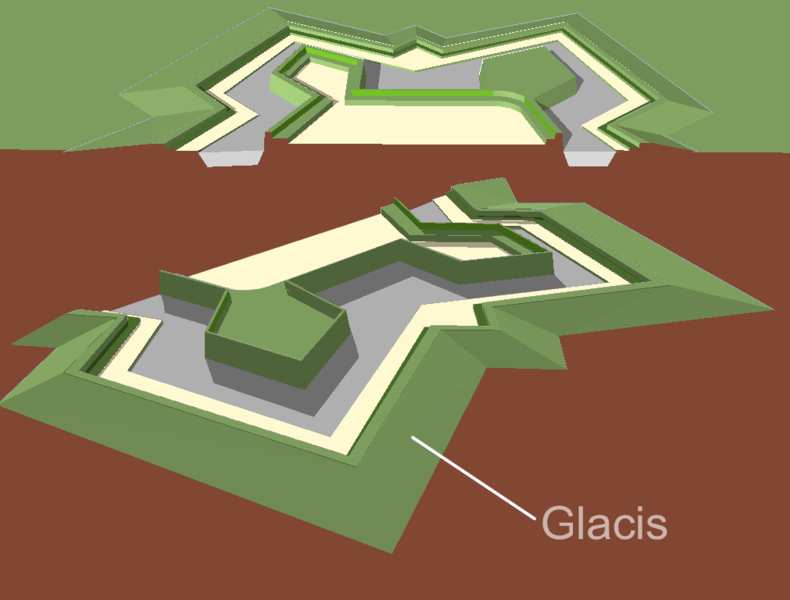
Drawing by Francis Lima via Wikimedia Commons.We can also do some work with the moat. By adding an earthwork directly in front of it, which arcs slightly uphill, called a glacis, we can both put the enemy at an angle where shots from our wall will run parallel to the ground, thus exposing the attackers further as they advance, and create a position for our own troops to come out of the fort and fire from further forward, by having them crouch in the moat behind the glacis. Indeed, having prepared, covered forward positions (which are designed to be entirely open to the fort) for firing from at defenders is extremely handy, so we could even put such firing positions – set up in these same, carefully mathematically calculated angle shapes, but much lower to the ground – out in front of the glacis; these get all sorts of names: a counterguard or couvreface if they’re a simple triangle-shape, a redan if they have something closer to a shallow bastion shape, and a flèche if they have a sharper, more pronounced face. Thus as an enemy advances, defending skirmishers can first fire from the redans and flèches, before falling back to fire from the glacis while the main garrison fires over their heads into the enemy from the bastions and outworks themselves.
A diagram showing a glacis supporting a pair of bastions, one hollow, one not.
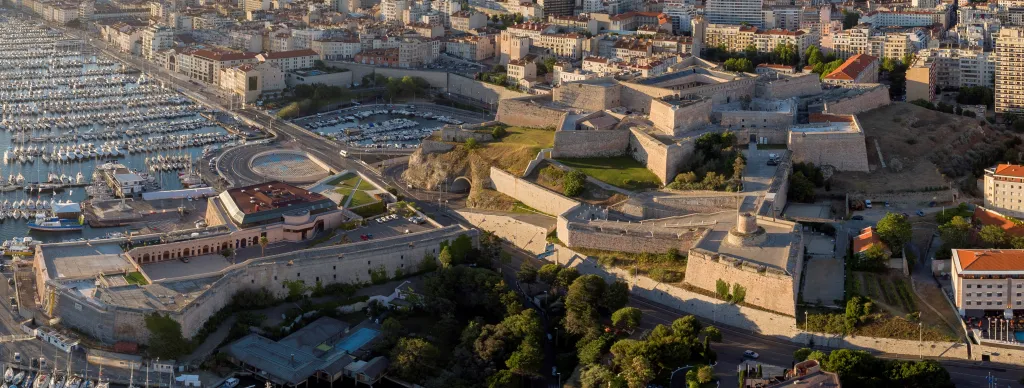
Diagram by Arch via Wikimedia Commons.At the same time, a bastion fortress complex might connect multiple complete circuits. In some cases, an entire bastion fort might be placed within the first, merely elevated above it (the term for this is a “cavalier“) so that both could fire, one over the other. Alternately, when entire cities were enclosed in these fortification systems (and that was common along the fracture zones between the emerging European great powers), something as large as a city might require an extensive fortress system, with bastions and outworks running the whole perimeter of the city, sometimes with nearly complete bastion fortresses placed within the network as citadels.
Fort Saint-Nicolas, which dominates the Old Port of Marseille. The fort forms part of a system with the low outwork you see here and also an older refitted castle, Fort Saint-Jean, on the other side of the harbor.
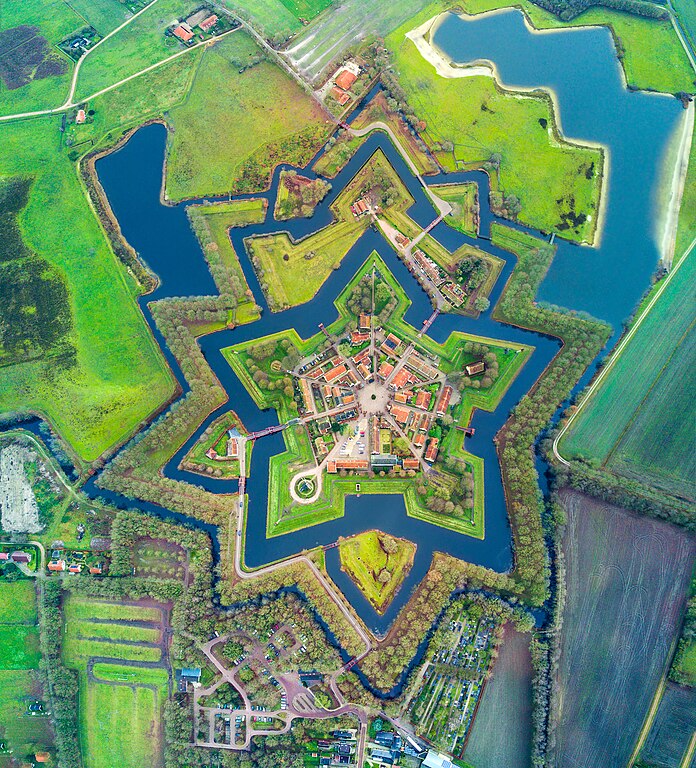
Photo via Wikimedia Commons.All of this geometry needed to be carefully laid out to ensure that all lines of approach were covered with as much fire as possible and that there were no blindspots along the wall. That in turn meant that the designers of these fortresses needed to be careful with their layout: the spacing, angles and lines all needed to be right, which required quite a lot of math and geometry to manage. Combined with the increasing importance of ballistics for calculating artillery trajectories, this led to an increasing emphasis on mathematics in the “science of warfare”, to the point that some military theorists began to argue (particularly as one pushes into the Enlightenment with its emphasis on the power of reason, logic and empirical investigation to answer all questions) that military affairs could be reduced to pure calculation, a “hard science” as it were, a point which Clausewitz (drink!) goes out of his way to dismiss (as does Ardant du Picq in Battle Studies, but at substantially greater length). But it isn’t hard to see how, in the heady centuries between 1500 and 1800 how the rapid way that science had revolutionized war and reduced activities once governed by tradition and habit to exercises in geometry, one might look forward and assume that trend would continue until the whole affair of war could be reduced to a set of theorems and postulates. It cannot be, of course – the problem is the human element (though the military training of those centuries worked hard to try to turn men into “mechanical soldiers” who could be expected to perform their role with the same neat mathmatical precision of a trace italienne ravelin). Nevertheless this tension – between the science of war and its art – was not new (it dates back at least as far as Hellenistic military manuals) nor is it yet settled.
An aerial view of the Bourtange Fortress in Groningen, Netherlands. Built in 1593, the fort has been restored to its 1750s configuration, seen here.
Photo by Dack9 via Wikimedia Commons.But coming back to our fancy forts, of course such fortresses required larger and larger garrisons to fire all of the muskets and cannon that their firepower oriented defense plans required. Fortunately for the fortress designers, state capacity in Europe was rising rapidly and so larger and larger armies were ready to hand. That causes all sorts of other knock on effects we’re not directly concerned with here (but see the bibliography at the top). For us, the more immediate problem is, well, now we’ve built one of these things … how on earth does one besiege it?
Bret Devereaux, “Collections: Fortification, Part IV: French Guns and Italian Lines”, A Collection of Unmitigated Pedantry, 2021-12-17.
November 10, 2024
WW2 in Numbers
World War Two
Published 9 Nov 2024World War II wasn’t just the deadliest conflict in history — it was a war of unprecedented scale. From staggering casualty numbers to military production and economic costs, this episode breaks down the biggest statistics that defined the global conflict.
(more…)
October 13, 2024
The Deadliest Day of the British Army: The Battle of the Somme
The Great War
Published Jun 14, 2024The Battle of the Somme was one of the bloodiest of the First World War. From July to November 1916, millions of men struggled to fight in mud, under crushing shellfire, or in a hail of machine gun bullets. The Somme has been a synonym for the futility of trench warfare, but also the subject of fierce debate – who really won the Battle of the Somme?
(more…)
October 3, 2024
D-Day 80th Anniversary Special, Part 2: Landings with firearms expert Jonathan Ferguson
Royal Armouries
Published Jun 12, 2024This year marks the 80th anniversary of D-Day, the Allied invasion of France which took place on 6th June 1944. From landing on the beaches of Normandy, the Allies would push the Nazi war machine and breach Hitler’s Atlantic Wall.
To commemorate this, we’re collaborating with IWM to release a special two-part episode as Jonathan will look at some of the weapons that influenced and shaped this historic moment in history.
Part 2 is all about the pivotal landings, including allied efforts to aid in its success.
0:00 Intro
0:25 Twin Vickers K Gun
2:03 Pointe du Hoc
2:45 Water off a DUKW’s back?
3:50 Magazines x3
4:07 Usage & History
5:50 Bring up the PIAT!
7:00 Dispelling (Or Projecting via Spigot) Myths
7:55 PIAT Firing Process
9:50 PIAT Details
10:31 Usage in D-Day
13:19 Pegasus Bridge
15:05 MG 42
15:41 Defensive Machine Gun
16:37 1200 RPM
17:35 Replaceable Barrel
19:08 Usage in D-Day
21:37 Sexton Self-Propelled Gun
21:33 Artillery in D-Day
22:15 Run-In Shoot
22:40 The Need for Mobile Artillery
23:25 Usage in D-Day
24:21 17-Pounder Gun
25:11 Function & Usage
26:05 Usage in D-Day
28:00 IWM at HMS Belfast
30:27 Outro
(more…)
August 30, 2024
QotD: The stalemate in the trenches, 1914-1918
Before that, it is worth recapping the core problem of the trench stalemate laid out last time. While the popular conception was that the main problem was machine-gun fire making trench assaults over open ground simply impossible, the actual dynamic was more complex. In particular, it was possible to create the conditions for a successful assault on enemy forward positions – often with a neutral or favorable casualty ratio – through the use of heavy artillery barrages. The trap this created, however, was that the barrages themselves tore up the terrain and infrastructure the army would need to bring up reinforcements to secure, expand and then exploit any initial success. Defenders responded to artillery with defense-in-depth, meaning that while a well-planned assault, preceded by a barrage, might overrun the forward positions, the main battle position was already placed further back and well-prepared to retake the lost ground in counter-attacks. It was simply impossible for the attacker to bring fresh troops (and move up his artillery) over the shattered, broken ground faster than the defender could do the same over intact railroad networks. The more artillery the attacker used to get the advantage in that first attack, the worse the ground his reserves had to move over became as a result of the shelling, but one couldn’t dispense with the barrage because without it, taking that first line was impossible and so the trap was sprung.
(I should note I am using “railroad networks” as a catch-all for a lot of different kinds of communications and logistics networks. The key technologies here are railroads, regular roads (which might speed along either leg infantry, horse-mobile troops and logistics, or trucks), and telegraph lines. That last element is important: the telegraph enabled instant, secure communications in war, an extremely valuable advantage, but required actual physical wires to work. Speed of communication was essential in order for an attack to be supported, so that command could know where reserves were needed or where artillery needed to go. Radio was also an option at this point, but it was very much a new technology and importantly not secure. Transmissions could be encoded (but often weren’t) and radios were expensive, finicky high technology. Telegraphs were older and more reliable technology, but of course after a barrage the attacker would need to be stringing new wire along behind them connecting back to their own telegraph systems in order to keep communications up. A counter-attack, supported by its own barrage, was bound to cut these lines strung over no man’s land, while of course the defender’s lines in their rear remained intact.)
Bret Devereaux, “Collections: No Man’s Land, Part II: Breaking the Stalemate”, A Collection of Unmitigated Pedantry, 2021-09-24.