Published on 21 Aug 2017
Paul shows how he handles and places his bench plane in the day to day of woodworking for practical use.
For more information on these topics, see https://paulsellers.com or https://woodworkingmasterclasses.com
September 1, 2017
Mis-placing Your Plane? | Paul Sellers
Comments Off on Mis-placing Your Plane? | Paul Sellers
August 9, 2017
How to use a Wooden Spokeshave | Paul Sellers
Published on 8 Aug 2017
Wooden spokeshaves may seem like they’ve been superseded, but they are very useful in the day to day of woodworking. A wooden sole means minimal friction and Paul shows how to easily micro adjust the blade for a variety of uses.
To make the Poor Man’s Spokeshave, see the series on YouTube (link: https://youtu.be/jZwzBbcwbgU).
Comments Off on How to use a Wooden Spokeshave | Paul Sellers
July 16, 2017
Woodworking magazines and the lack of safety equipment in photos
I’ve bought hundreds of woodworking magazines over the years, and in almost every one of them they show machine tool operations where the blade guards have been removed “to clearly illustrate the task”. I understand that reasoning, but the cumulative effect of literally thousands of well-posed, clear, and dangerous practices is almost certainly to lessen the background awareness of new woodworkers to safe use of the tools. When I first got into woodworking, I was buying at least half a dozen magazines every month (ShopNotes, Woodsmith, Popular Woodworking, Fine Woodworking, Woodworker’s Journal, etc.) because I hadn’t touched a real woodworking tool since I was in middle school (and I hated shop at that time anyway), and I knew I needed as much help as I could get.
If I hadn’t been a safety wuss, I’d likely have internalized the “common wisdom” that everyone always takes off the blade guard of the table saw — because they so rarely showed up in the magazine articles and when they did, they made the photo less helpful because of the area of the work they obscured. Overheard conversations at woodworking shows often included comments about throwing away the stock blade guard as soon as possible … and not to replace it with an expensive after-market item, either.
Paul Sellers, who generally works with hand tools, has also been irritated by this and his latest blog post takes the magazines to task:
I thumbed through recent issues of wood mags and though I have known it for years, I thought it might be good to tackle the giant issue surrounding machine safety as some woodworking magazines don’t always project the right image. In fact some give the impression that no safeguards or safety equipment is necessary at all, the exact opposite of what the woodworking machine industry teaches altogether. My concern is that the woodworking magazines get most of their support from amateur woodworkers looking for guidance and inspiration. This advertising sector caters to the amateur woodworker industry with only a little crossover into professional realms. Thumbing through the magazines I was not really considering safety at all, just looking for content of interest to me, but I soon became conscious of the lack of safety equipment being used, which started my inbuilt alarm bells started ringing page after page. See if the images below don’t cause the same sense of concern for you.
[…]
So here we are, five images spanning a few pages with not a face shield in sight and only one pair of safety glasses between four of the five images. Then we have zero regard for any dust protection issues and that is of great concern to all woodworkers. Now I know you can say to me that all woodworkers know about machine dust, tablesaw kick-back issues, noise that causes partial impairment and even permanent hearing loss and so on. Of course that is not really true at all. The people in the pictures are all professional-level woodworkers, authors, editors and so on. Evidently they don’t feel the image they convey with regards to safety is questionable. If that is so, why would we expect the amateurs and those brand new to woodworking to be conscious of dangers that are often less obvious and even well hidden.
The trip mechanism in my brain asked the question, why is it that something so unarguably dangerous as machine woodworking is presented with such passivity toward safety and with no need to show industry standards for normal health and safety protocol put together by professional bodies of the woodworking industry itself? Yes, I know all the reasonable arguments. “They are just posing and not really working.” “The machines are not switched on, perhaps, therefore there is no need to wear any safety equipment. Why would you?” Well, actually, in a couple of the images, the tablesaw is running and there is no need for anyone looking in, to believe that the others are not either anyway.
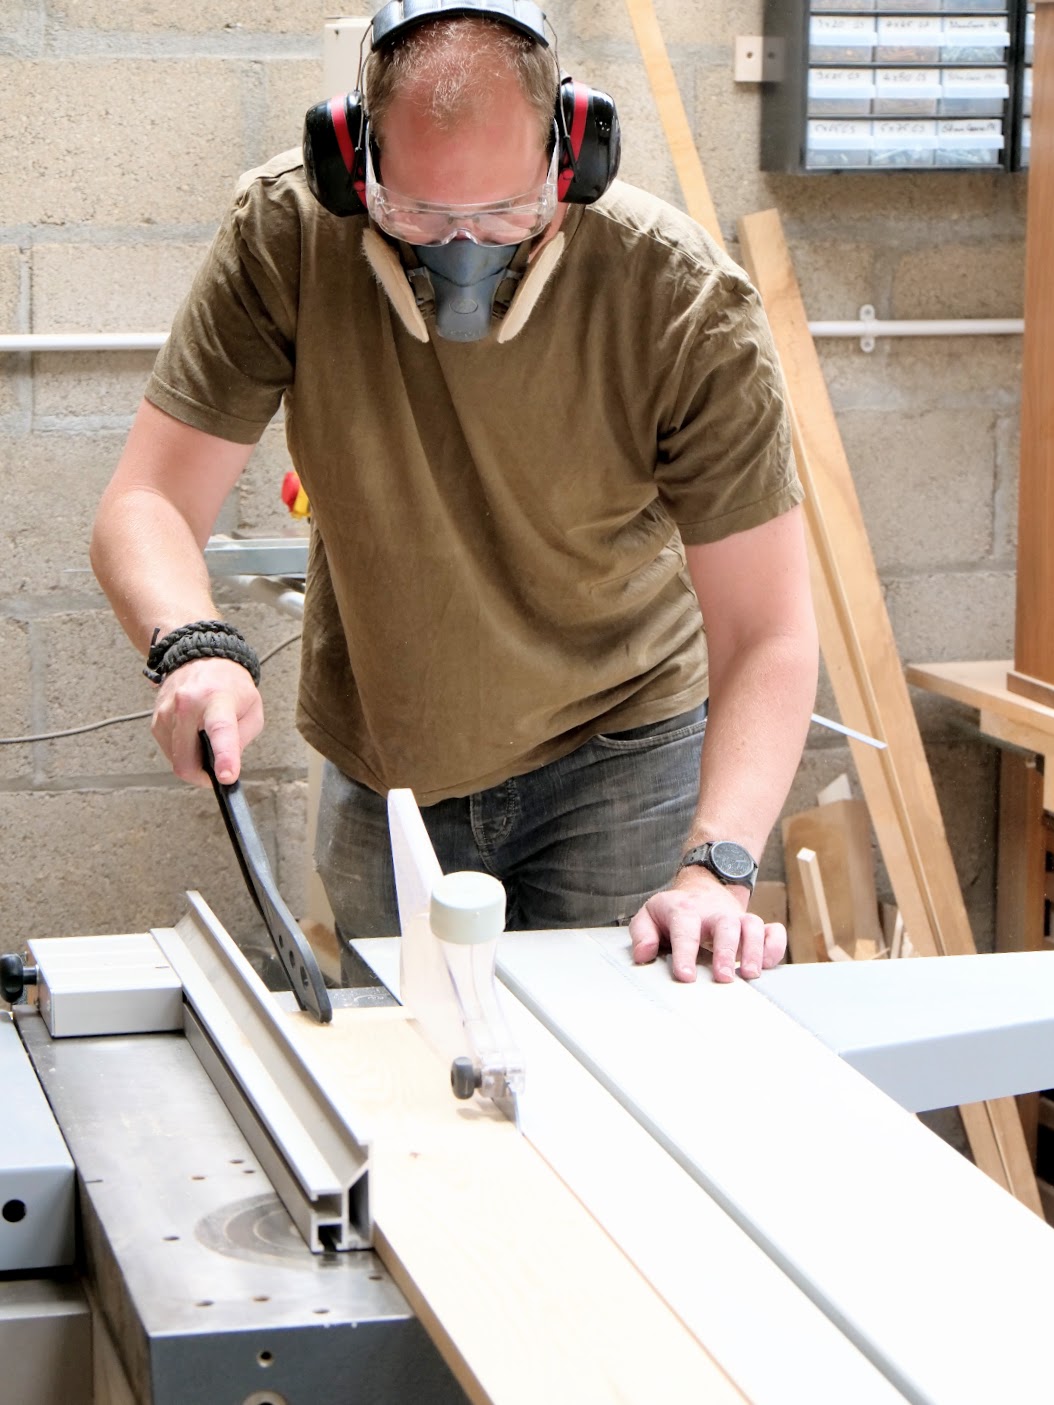
Image 1:
a: The man has no safety mask on at all b: There is no blade guard over the blade c: The man has no safety glasses on. d: The man has no protective dust mask or respirator equipment.
The dangers ever present in this scenario are: 1: He is breathing harmful dust as he works with the machine no matter how good any dust extraction is. 2: Even though there is a riving knife in place my experience has shown that the wood can still close over on the rear upthrust of the blade and and kick-back the wood at his upper body and face. 3: There is no doubt that the small offcut is a missile waiting to catch. The drafts and movement of wood often cause an upthrust on small pieces and can deliver them to the rear upthrust of the blade once detached as shown. 4: The dust from tablesaws is of course extremely fine and circulates in the atmosphere even with the best dust extraction in the world. This dust is some of the most harmful to the whole respiratory system, eyes, nasal passages and throat.

I use a tablesaw sled similar to the one shown in the photo above, and to use it I have to remove the blade guard on my saw. I’ve considered adding a plexiglass strip over the blade opening for quite some time, to provide at least some protection against offcuts being kicked back from the back of the saw blade. I always use hearing protection when using any of my power tools, but I don’t always add a dust mask unless I’m doing a lot of cutting over a short period of time. Perhaps I should reconsider that.
This is the real McCoy. My friend Chris gears up every time, as I and others do.
So why do the editors allow poses that include the faces? As far as information goes the faces or facial expressions give nothing to the reader and are inconsequential. Mostly it’s to do with presenting the acceptable image that down plays the essentiality of safety to its core audience. In my view it is of little value to put a little disclaimer in the corner of a page if the images send another message that woodworking without protective equipment is perfectly safe. No one is exempted from responsibility in this. Not the authors, the photographers, the editors or the publishers. They all have responsibility for promoting unsafe practices. Even with safety equipment things go wrong in a split second. We can take care of our lungs, eyes and faces with very low-maintenance equipment.
My advice to any new woodworker wanting to compliment their work by using machines for dimensioning stock would be to find courses tailored to specific machines. Good online material is available from recognised institutions too. You must be careful of course, as looking for information based on good experience can be hard as some things are based more on opinion than experience. Look for experienced teachers and organisations with the right background. Generally these are information based but then you must put into practice what you are taught and by experience you will gain the experience you need to anticipate potential issues. No one else can substitute for your individual responsibility.
Comments Off on Woodworking magazines and the lack of safety equipment in photos
July 7, 2017
How to Prepare Stock for Joinery | Paul Sellers
Published on 23 Jun 2017
What do you need to do to your dimensioned wood to prepare it for joinery? Often there are undulations or machine marks in the surface of the wood, or movement after dimensioning that needs removing before joinery layout occurs. Let’s work on getting the silky smooth surface and square faces that make for crisp, accurate joinery.
For more information on these topics, see https://paulsellers.com or https://woodworkingmasterclasses.com
Comments Off on How to Prepare Stock for Joinery | Paul Sellers
June 28, 2017
Handsaw comparison – Japanese pull-cut versus Western push-cut
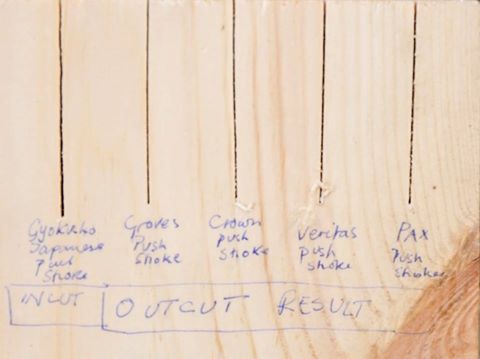
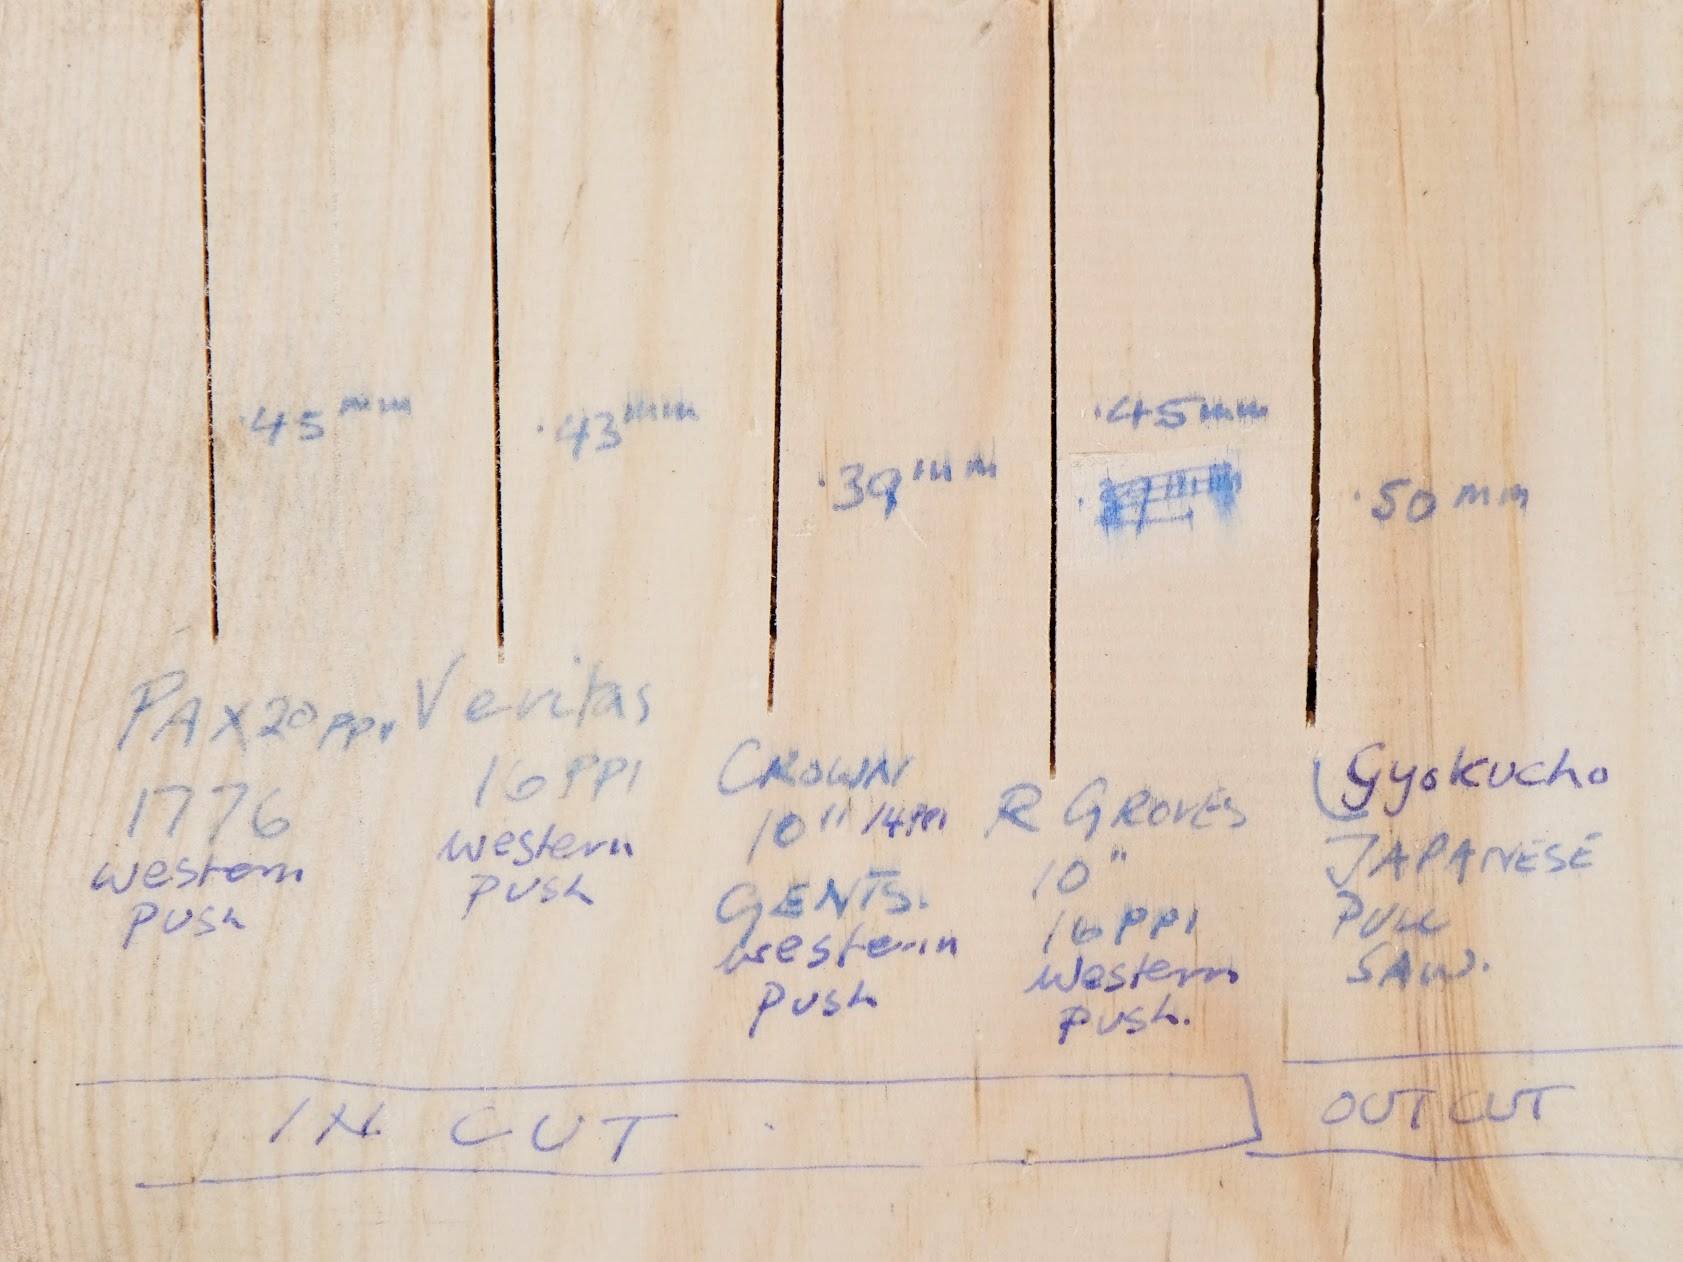
On Facebook, Paul Sellers posted a couple of photos showing the differences between some traditional western hand saws, which cut on the push stroke, and traditional Japanese hand saws, which cut on the pull stroke:
When you hear people say Japanese saws cut better, cut cleaner, cut faster, cut easier, usually it’s not necessarily true. In reality the Japanese saws cut on a pull stroke and the western saw on a push. When sharpened properly both cut very well. The difference for me is that one is a throwaway, the other a keeper for a lifetime. I own saws made in England and the USA that are totally functional and range in age from between the early 1800s 1860s and some up to date that I use daily. You can make any saw any thickness you like and it will work well.
Just saying.The main difference nowadays is you throw away the Japanese saws because you can’t sharpen them whereas a decent western saw can be sharpened, well, for 200 years when you learn how. Most people can master saw sharpening with an hour of practice.
Comments Off on Handsaw comparison – Japanese pull-cut versus Western push-cut
June 25, 2017
Sometimes, the workman is right to blame his tools
Paul Sellers recently bought and tested a new Two Cherries brand “Gent’s saw” and was very unhappy with the tool:
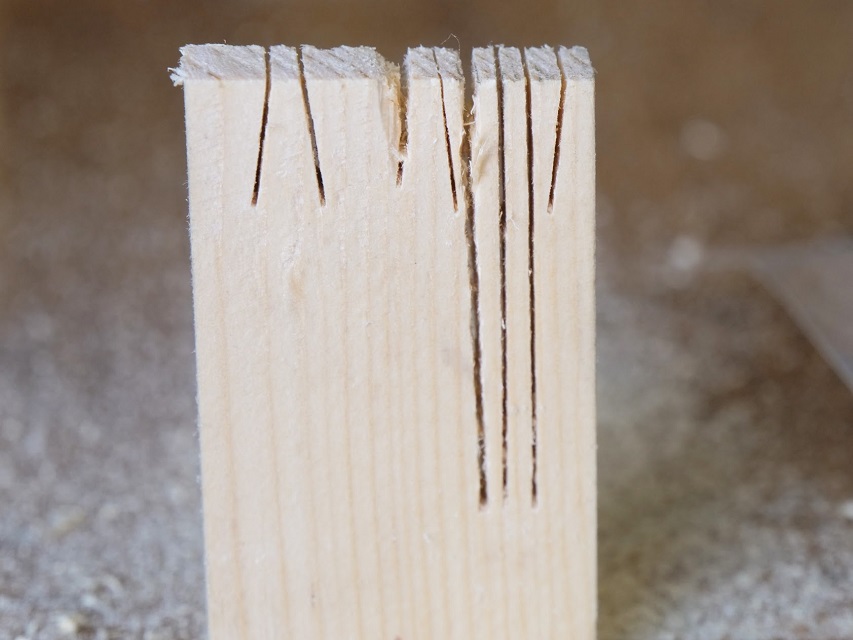
This week I picked up a brand new gent’s saw straight from the pack made by the famous German tool makers Two Cherries. I noticed the unusual tooth shape, which strangely resembled the edge of a tin can when we used to open it with a multipurpose survival knife. I wondered how it would work and whether it was just a miscut. I examined several others and realised it was actually intentional as they were indeed manufactured that way. I offered the saw to the wood and the very middle cut with the dovetailed angle and the broken off section was the results of ten strokes.
“The long saw cut on the left is how the saw cuts by a man who has used such saws every day, six days a week for 53 years. The two to the right are how it cuts after sharpening and redefining the teeth.”
Could this truly be the end product of the once highly acclaimed Two Cherries of German tool manufacturing? I looked at the packet and, well, there it was; Made in Germany. So here is my perspective on the saw. Nice beechwood handle–nicely shaped (but it is unfinished), nice brass back, good quality steel plate, not too soft, not too hard. Two Cherries, the materials leave you no excuse for making such a poor grade product. YOU should be very ASHAMED of your product and yourselves. It is the very worst saw of any and all saws ever, ever, ever manufactured. I have never seen anything worse.
[…]
If you bought this saw and you thought the outcome was a result of your inexperience. It’s not. Blame the tool maker. It’s his pure arrogance to think he can pass something off to you like this and call it a dovetail saw. Shame on you Two Cherries, shame on you!
Comments Off on Sometimes, the workman is right to blame his tools
June 22, 2017
How to Make Snap-to-Line Templates | Paul Sellers
Published on 12 Jun 2017
Paul shows his prefered method for making plastic templates for drawing, layout and shaping. Using the correct materials, it is easy to cut to exact shapes and sizes with crisp traceable edges. They can be easily shaped using various tools. Paul gives some ideas of possible uses in the day-to-day of woodworking.
Paul uses styrene plastic for his templates. See here for more information: https://paulsellers.com/2017/03/making-templates/
Comments Off on How to Make Snap-to-Line Templates | Paul Sellers
June 12, 2017
How to Make a Dovetail Template | Paul Sellers
Published on 2 Jun 2017
Paul introduces the dovetail template that he has been making and using for over 50 years. It helps you to efficiently mark out the dovetail angle. Making it requires a high degree of accuracy and attention to detail, in order for it to be used as a reference.
Comments Off on How to Make a Dovetail Template | Paul Sellers
May 28, 2017
How to make a Half-lap Dovetail | Paul Sellers
Published on 18 May 2017
The half-lap dovetail is possibly the most common of all the dovetails used today. It is used for the front corners of drawers, and anywhere where you want to use a dovetail which is not visible from a certain viewpoint. Paul has developed a method which includes a small rebate, that helps in aligning the components to achieve the crisp definition of quality half lapped dovetails.
For more information on these topics, see https://paulsellers.com or https://woodworkingmasterclasses.com
Comments Off on How to make a Half-lap Dovetail | Paul Sellers
March 15, 2017
Making a Poor Man’s Mitre Box with Paul Sellers
Published on 11 Mar 2016
The best way to get hold of a mitre box that suits your needs is to make your own. In this video, Paul shows how he makes one in a matter of minutes that guarantees accuracy, especially when used in combination with a shooting board (link to shooting board video). They can be used for many things such as trim for tool chests, boxes and drawers as well as picture frames and the like.
Comments Off on Making a Poor Man’s Mitre Box with Paul Sellers
March 3, 2017
Sharpening a Chisel with Paul Sellers
Published on 27 Feb 2017
Chisels come from the manufacturer needing preparing or initialising as well sharpening. How do you check they are flat and get them sharp? Paul shows you the process he follows. This gets them to the level we need for crisp and accurate work.
For more information on these topics, see https://paulsellers.com or https://woodworkingmasterclasses.com
Comments Off on Sharpening a Chisel with Paul Sellers
December 13, 2015
How to Sharpen a Knife with Paul Sellers
Published on 11 Dec 2015
Paul shows his very simple method of how to get a razor sharp edge on your kitchen, carving, pocket or any form of knife using just a few pieces of sandpaper or some diamond paddles.
Comments Off on How to Sharpen a Knife with Paul Sellers
July 27, 2015
Sharpening and Setting the Bench Plane with Paul Sellers
Published on 23 Jul 2015
Paul Sellers shows how he sharpens and sets a bench plane in his every day of work. A quick and easy guide to get your plane working.
February 21, 2015
How to make the Three Joints – Dovetail – with Paul Sellers
Published on 17 Feb 2015
It takes a master woodworker to teach the basics. Watch Paul’s every move in this video. He shows every single detail of cutting this essential woodworking joint. This is one of the three joints that Paul talks about in his woodworking curriculum. The dovetail is the essential box joint. It is the strongest way to join two pieces of wood at the corner. Although there are many variations on a theme with this joint mastering the most simple form is the most difficult and important step.
Comments Off on How to make the Three Joints – Dovetail – with Paul Sellers
December 21, 2014
Woodworking Christmas Gifts and Projects – with Paul Sellers
Published on 20 Dec 2013
In this holiday themed video Paul Sellers give some advice on buying a new woodworker some basic tools. He shows how to make a small tree decoration. He also shows how to make a wooden propeller toy, a mixing spatula and a cutting board.
Comments Off on Woodworking Christmas Gifts and Projects – with Paul Sellers